![]()
Do you want to track multiple sub-domains in one Google Analytics account? In this complete guide, you will learn cross-domain tracking in Google Analytics.
You will learn various methods to implement cross-domain tracking for 2 or more websites or domains int his guide.
Most of the businesses miss important business opportunities because of the lack of audience insights.
Most of the marketing and advertising campaigns are data-driven. In this situation, Google Analytics data plays an important role here.
What is cross-domain tracking Google Analytics?
When you have multiple websites, multiple tracking codes integrated on your website, Google Analytics collects the data separately, and that is too much pain to combine the data to make the right decision for marketing.
To solve that issue, and combine the Google analytics data for your website, and sub-domains, you need to implement right google analytics cross-domain tracking.
By doing this, you can collect all the data in one place and you can easily find the insights which are helpful for your business.
Google Analytics cross-domain tracking is the process of measuring two related or different websites as one.
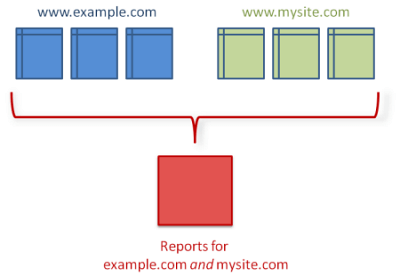
Image source: Google Support
Why you need Cross-Domain Tracking in Google Analytics?
Example: If you have a website ‘semupdates.com’ and your blog is on ‘blog.semupdates.com’. Or you have multiple microsites or sub-domains like services.semupdates.com etc.
Challenge with multiple analytics tracking for sub-domains:
When a user visits your main website and clicks on the blog tab or go to any other microsite or sub-domain. Google Analytics tracking algorithm loses the path of that session and the session gets terminated.
Another example is when you have an eCommerce store where you are displaying all your product catalog when users want to checkout you are redirecting them to one of your sub-domain or microsite, which is very common these days. A lot of retailers join as an affiliate marketer and create microsites for that.
But when the user makes a purchase on your eCommerce site, Google Analytics loses the path of the visitor if they move to another sub-domain. The conversion attribution becomes difficult in this scenario. You can collect the user’s insight.
To track the visitors coming to the site and going to the subdomain, you need to integrate google analytics cross-domain tracking.
You can implement Analytics tracking in various cases:
Source: Google Support
Why you should not use separate tracking codes for your sub-domains?
Understand this concept with the above eCommerce store example.
If your visitors come to a product page, added the product in the cart and then moved to another subdomain to make the purchase and convert as a customer.
You can’t see the accurate data in Google Analytics, and it leads to the wrong decision.
Analytics will show you a high bounce rate, even though your visitor is on your sub-domain.
The solution for multiple subdomain tracking
But if you implement the right google analytics cross-domain tracking on your websites, you will be able to get accurate data.
Google Analytics will be able to track the visitors landing to your site and running through the blog section or any other section on your website or other microsites.
Google Analytics adds a string when the user clicks on the sub-domain in the navigation menu bar.
That string helps you implement cross-domain tracking successfully, from the main site to microsite and vise versa.
That cross-domain tracking code in web browser looks like this:
![]()
What skills are required for Google Analytics cross-domain tracking?
You should start implementing cross-domain tracking for your website and sub-domains.
For that, you must have the knowledge of Google Tag Manager, Google Analytics, and HTML basic tags, understanding of basic tracking objects, cookings, client IDs, linkers, etc.
In this guide, you will see the step by step implementation of cross-domain tracking. You can follow the screenshots and dummy code snippets to understand the concept of how it works. We have shared multiple scenarios in where might need to implement Google Analytics cross-domain tracking.
Before you start you must understand the technicalities of it. Cross-domain tracking requires careful editing of the tracking code. A small mistake could lead you to a huge mess, then you have to start from scratch.
How to implement Google Analytics cross-domain tracking for two different domains?
To implement Google Analytics cross-domain tracking successfully, you must have the knowledge of HTML & Javascript, or you would need a web developer for that.
Create a single property in your Google Analytics account for both your domain and sub-domain.
Now, you will have to use the same google analytics tracking ID on both sites which you would like to link.
You have to make a few updates in your Google Analytics tracking code to implement cross-domain tracking.
Follow these steps:
- Go to the Analytics -> Admin -> Tracking info – > Tracking code
- Copy this Google analytics tracking code in the text file before making changes in the code
- Make a copy of your tracking code separately before making the changes, so you can check the changes later
Now learn various methods to implement cross-domain tracking for your websites as per your requirement.
There are two methods to do cross-domain tracking:
- Using Google Tag Manager (GTM)
- Manually adding code on both sites
#1 Google Analytics cross-domain tracking with Google Tag Manager (GTM):
Google Tag Manager is a tool by Google that helps you implement multiple tracking codes on the website without any code updates on the website.
- Create a Google Tag Manager account with the same Gmail id by which you created a Google Analytics account.
- Setup the container in Google Tag Manager – > Then move the main dashboard
Follow the instructions to implement cross-domain tracking through GTM:
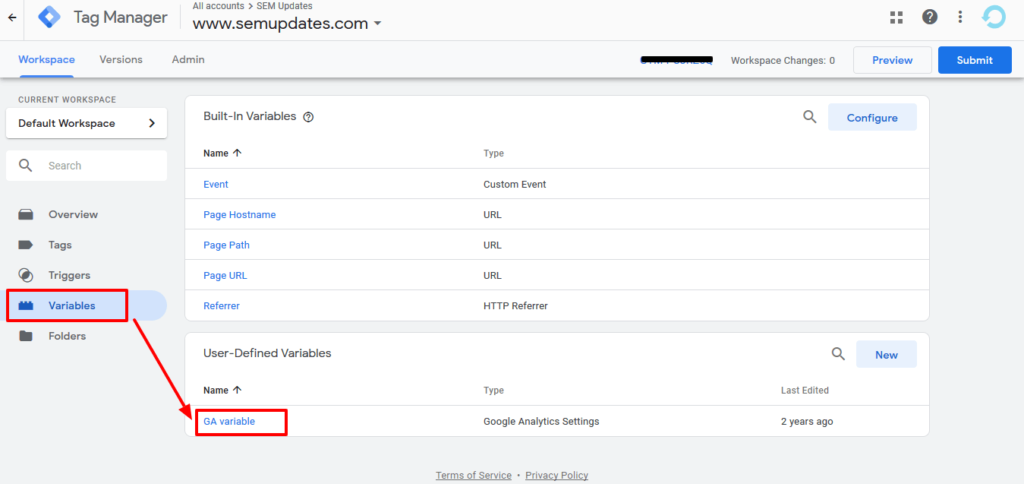
First, go to the variables section and navigate to Google Analytics variable you have created previously on GTM for Google Analytics cross-domain tracking.
Variables are created on the data layers, so once you make any changes to this, it will automatically reflect all the tags created using this variable.
Enter your cookie domain which is your main domain/source domain. Then click on the ‘More Settings’ option.
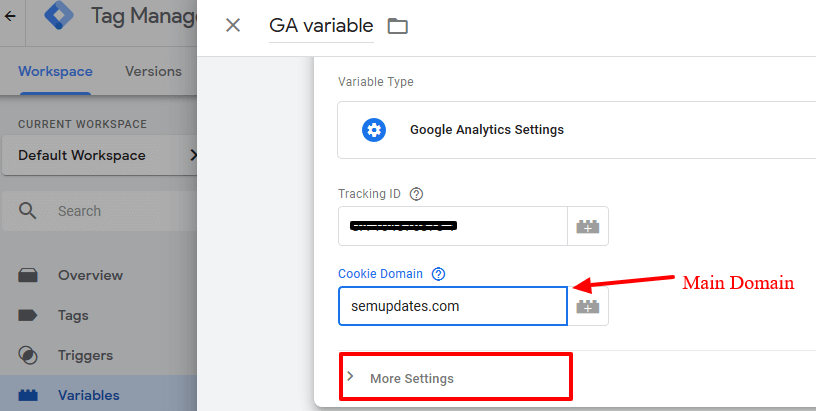
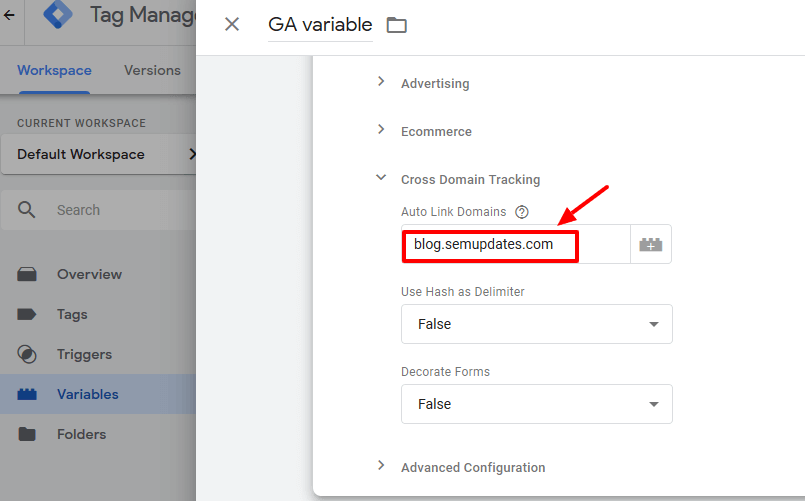
Then you will see the ‘Cross-domain tracking’ option in the drop-down menu. Expand all the fields
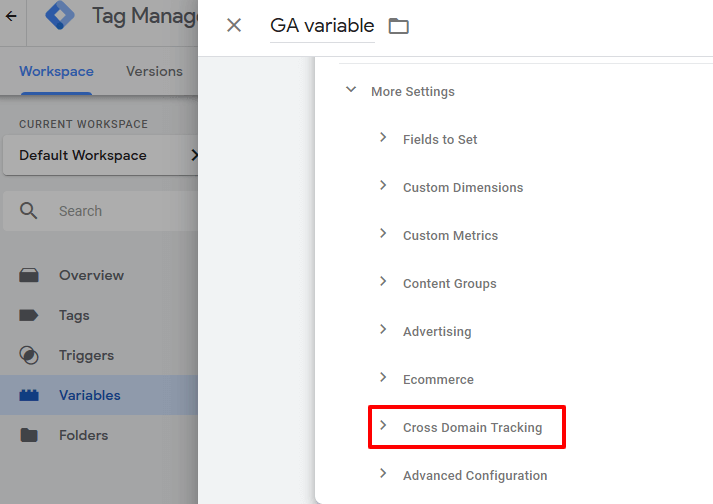
Fill up all the required fields under the ‘Cross-Domain Tracking’ menu. Add all the domain which you would like to link with your main domain in this field ‘Auto Link Domains’. Do not make any changes to the remaining fields.
Then scroll up in the ‘More Settings’ drop-down menu and follow the procedure numbered below:
- Click on ‘Field to set’
- Select the ‘allowLinker’ option from the dropdown
- Add ‘true’ in the ‘Value’ field
- Click on the ‘Save’ button at the top right corner
- Publish the container and you are done!

#2 Manually adding the code on both sites for cross-domain tracking in Google Analytics implementation
To manually add the code on the site, you have to extract code from your analytics account as per the given instructions in the beginning.
To link both sites code manually you have to establish a linker between them.
Establish Linker between the sites for cross-domain tracking using these methods:
- By using analytics.js
- By using gtag.js
(A) Implement Google Analytics cross-domain tracking using analytics.js
Case – 1: When you have one 2 domains only
Default Google Analytics tracking looks like this in JS:
![]()
Find the create a line in the snippet. For a website called example-1.com, it looks like this:
ga('create', 'UA-XXXXXXX-Y', 'example-1.com');
Make the following changes to the snippet (the changes you need to make are in bold red text):
ga(‘create', 'UA-XXXXXXX-Y', 'auto', {'allowLinker': true});
ga('require', 'linker');
ga('linker:autoLink', ['example-2.com']);
Remember to replace the example Google Analytics ID (UA-XXXXXX-Y) with your own ID, and replace the example secondary domain (example-2.com) with your own secondary domain name.
Case – 2: When you have three or more domains
![]()
Follow the example above, but add the other domains to the autoLink plugin. Even the additional comma here is important:
ga('linker:autoLink', ['example-2.com', 'example-3.com'] );
(B) Implement Google Analytics cross-domain tracking using gtag.js
Your original gtag.js looks like this when you copy it from your analytics account.
<!-- Global site tag (gtag.js) - Google Analytics -->
<script async src="https://www.googletagmanager.com/gtag/js?id=UA-XXXXXXXX-X"></script>
<script>
window.dataLayer = window.dataLayer || [];
function gtag(){dataLayer.push(arguments);}
gtag('js', new Date());
gtag('config', 'UA-XXXXXXXX-X');
</script>
On the main domain, make the following changes:
<script async src="https://www.googletagmanager.com/gtag/js?id=GA-TRACKING_ID"></script>
<script>
window.dataLayer = window.dataLayer || [];
function gtag(){dataLayer.push(arguments);}
gtag('set', 'linker', {'domains': ['example.com']});
gtag('js', new Date());

gtag('config', 'GA-TRACKING_ID');
</script>OR you can can put this way:

gtag('config', 'GA_tracking_ID', {
'linker': {
'domains': ['example.com']
}
});
On the sub-domain of the other site, make the following changes in gtag.js
gtag('config', 'GA_tracking_ID', {
'linker': {
'accept_incoming': true
}
});
Bi-directional Google Analytics cross-domain tracking guide
Here is the following instruction to implement Google analytics cross-domain tracking for bi-directional user flow:
On source.com, update the property’s config:
gtag('config', 'GA_tracking_ID', {
'linker': {
'domains': ['example-destination.com']
}
});
On destination.com, update the property’s config:
gtag('config', 'GA_tracking_ID', {
'linker': {
'domains': ['example-source.com']
}
});
Using a single snippet on all domains
On example-1.com, update the property’s config:
gtag('config', 'GA_MEASUREMENT_ID_1', {
'linker': {
'domains': ['example-1.com', 'example-2.com']
}
});
On example-2.com, update the property’s config:
gtag('config', 'GA_MEASUREMENT_ID_2', {
'linker': {
'domains': ['example-1.com', 'example-2.com']
}
});
What’s next?
Once you are done with code placements, Google Analytics will be able to gather data from both sites and will combine it in one view.
Then the challenge would be to figure out – which domain are they visiting?
For example – In the site content Google Analytics report you will see:
/about/contactUs.html
/about/contactUs.html
/products/buy.html
Domain names are not visible in the content drill-down reports in the Google Analytics dashboard.
So, how will you decide which domain this page belongs to?
The solution to implementing view for both sub-domains:
- Go to the Admin section of your analytics account
- Create a new view to applying various filters, so that you will have a backup view
- Once you created the view, then go to the advanced filter at the view level

- Click on the filters -> custom filter
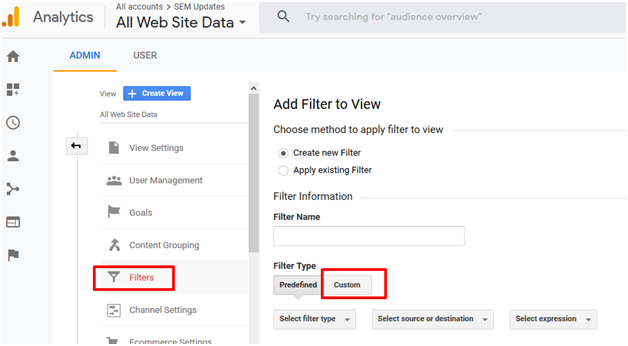
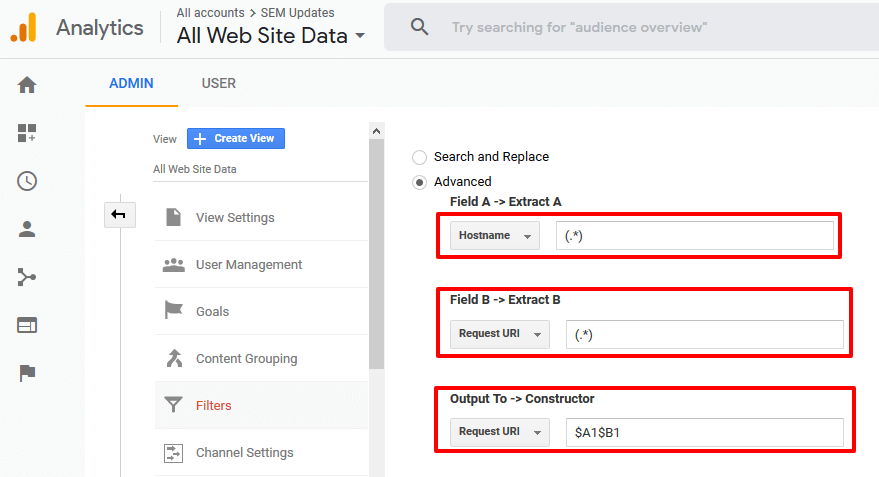
- When you click on the ‘Custom’ filter You will see various types of filters below. Select ‘Advance’. Fill up the fields as mentioned below and Save the filter:
-
- Field A –> Extract A: Hostname = (.*)
- Field B –> Extract B: Request URI = (.*)
- Output To –> Constructor: Request URI = $A1$B1
How you exclude your site to be displayed in the referral?
When visitors navigate from one sub-domain to another, it will show your site, analytics shows the data in ‘Referral traffic’ and then it leads to creating a new session.
So, this is not the correct way to get accurate data. You need to take one last step to fix this issue.
Solution:
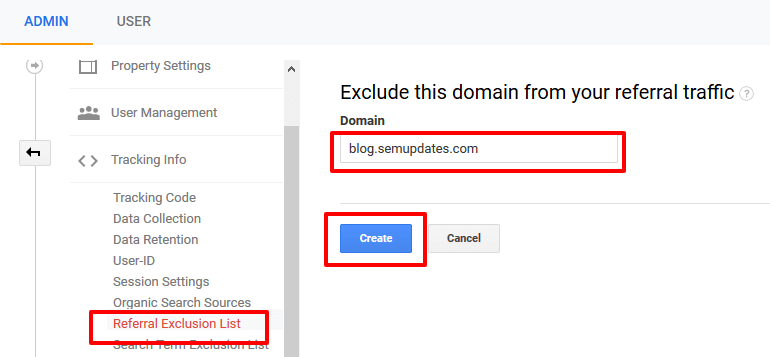
To make these visits as a single session across multiple domains, you have to create a referral exclusion list. Follow the instructions to do that:
- Go to the admin section in your analytics account
- Click on ‘Tracking Info’ in ‘Property’ tab
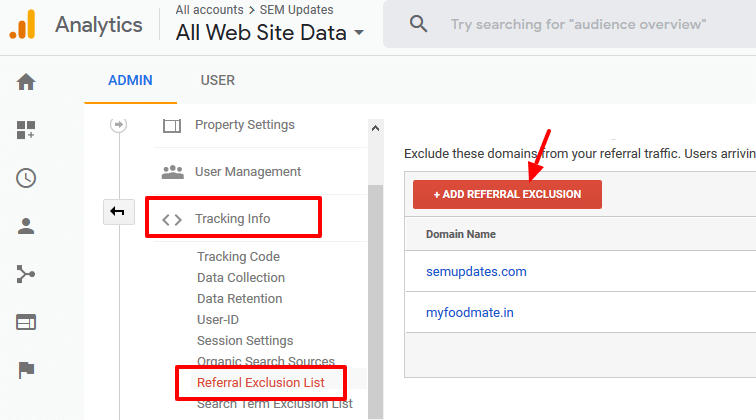
- Click on the ‘+ ADD REFERRAL EXCLUSION’ button and enter the domain which you don’t want to see in the referral traffic source section in the reporting. Then click on the ‘Create’ button.
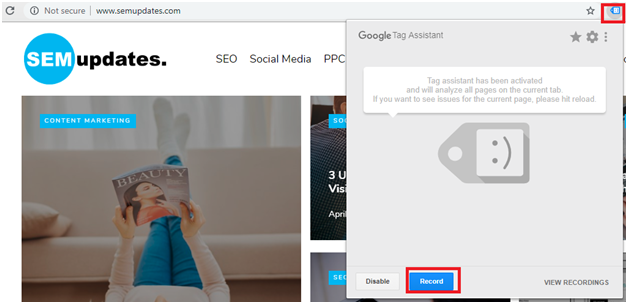
To verify your Google analytics cross-domain tracking code settings you have done, please run through ‘Google Tag Assistant’ recording:
- Install ‘Google Tag Assistant’ chrome extension.
- Open your website, then click on the GTA icon in the browser. Then click on Record, and later you can view the recording it the cross-domain tracking working fine.
Conclusion
Google keeps updating its tools Analytics, GTM, and others. This cross-domain tracking guide for Google Analytics is updated as per the recent changes Google made in its tracking code. Hope it will solve your tracking issues.
Most of the professionals follow these google analytics cross-domain tracking practices in different combinations. To gather the right data is important for better marketing campaign planning and decision making. Cross-domain tracking is a very crucial element in customer behavior analysis. You need to make sure you are following the best practices for the same.
How cross-domain tracking solved your business challenges? Write to us in the comments.


I do agree with all of the ideas you’ve offered to your post. They’re really convincing and can certainly work.
Still, the posts are very brief for novices. May you please prolong them a little from subsequent time? Thanks for the post.